
When shoe adhesive traders change suppliers, they do not only compare price and initial tack. They also want to know if the new adhesive can reduce strong odor, glue marks, and yellowing in shoe production. When these problems happen again and again, they increase rework, complaints, and after-sales costs. They may also harm the long-term relationship between the trader and the shoe factory.
However, these three problems do not always come only from the adhesive formula. The material type, coating amount, oven settings, spray method, and storage conditions can also affect the final result.
This article explains how to find and improve odor, glue marks, and yellowing. It looks at five areas: what the problem looks like, why it happens, how to adjust settings, how to check it on site, and how to compare products under the same conditions.
Note: The values in this article are only starting points for factory tests. They are not fixed standards for every shoe adhesive, shoe material, or production line. Final production settings should follow the product TDS and SDS, the equipment manual, and the results of a small trial run.
Why Does the Adhesive Still Have a Strong Odor After Use?
When a shoe factory uses solvent-based adhesive, the solvent must fully evaporate. Only then can the adhesive film reach the right state for bonding or heat activation.
If the oven is too cool, the drying time is too short, or the hot-air flow and exhaust are weak, some solvent may stay inside the adhesive film. After bonding, this solvent can be trapped between the upper and the sole.
1. What Problems Can Happen When Solvent Does Not Fully Leave?
Common signs include:
The finished shoes still have a clear solvent odor.
The odor becomes stronger after packing.
Bubbles or wet spots appear inside the adhesive film.
Adhesive is pushed toward the edges after pressing.
The first bond looks normal, but the strength drops later.
A strong odor appears only after sealed storage or transport.
So, a strong odor in finished shoes does not always mean the adhesive formula is poor. The coating amount, drying settings, or exhaust system may be the real cause.
2. What Oven Temperature and Drying Time Should Be Used?
Different shoe adhesives use different resins, solvents, solid contents, coating amounts, and open times. There is no single drying setting for every product.
To find suitable settings for the current production line, start with a trial test:
| Test item | Suggested test range |
| Oven temperature | 45°C, 50°C, 55°C, 60°C |
| Drying time | 3 minutes, 5 minutes, 8 minutes |
| Other conditions | Keep the material, coating amount, adhesive batch, and exhaust the same |
This test plan is only used to find suitable settings. It is not an industry standard.
Follow these rules during the test:
Start heat-sensitive materials at a lower temperature.
For mesh, thin PU leather, light-colored materials, and materials that may shrink, start testing at 45-50°C.
For thick materials, increase the drying time first.
If the coating is heavy or the material is thick or porous, first add more drying time. Do not raise the temperature too much at once.
Change only one setting at a time.
Keep the time the same and raise the temperature by 5°C each test. Or keep the temperature the same and add 1-2 minutes.
Measure the real oven temperature.
The oven display may not match the temperature on the material surface. Check it with a calibrated temperature tool.
Check hot-air flow and exhaust.
Heat alone is not enough. Without steady airflow, solvent vapor may stay inside the oven.
Do not confuse drying with heat activation.
Drying removes solvent. Heat activation makes the dry adhesive film ready for bonding again. These are two different steps.
Some official shoe adhesive guides give very different rules for air-drying time and heat activation. They also warn that materials, room conditions, storage, and working methods can change the final result. Users must test the product for the real use.
3. How Can You Tell When the Adhesive Film Is Ready for Bonding?
Method 1: Light Touch Check
Some spray adhesive guides suggest lightly touching the film to check its condition:
If adhesive clearly moves onto the test surface, the film is still too wet.
If the film feels tacky but does not move, it is usually close to the right bonding state.
If the film has almost no tack, it may have been left too long or dried too much.
Workers should wear the protective equipment listed in the product SDS. Do not touch the adhesive with bare skin.
Method 2: Check Film Appearance
When the solvent has not fully left, the film may show:
Wet and shiny spots.
Uneven color.
Clear shine in thick areas.
Bubbles on the surface.
Adhesive pushed out at the edges after pressing.
A normal film should be smooth, even, and unbroken. It should not have wet spots or thick pools.
Method 3: Weigh Standard Test Pieces
Use test pieces with the same size and material:
Record the weight before coating.
Apply the same weight of adhesive.
Weigh the piece before it enters the oven.
Weigh it again after drying.
Repeat the weighing at fixed time points.
When two results in a row are almost the same, most of the volatile material has left.
Each company can set its own limit based on the accuracy of its equipment. For example, it may set a maximum weight change between two tests. The technical or quality team should set this limit through real tests. Do not copy a number from another factory.
Why Do Glue Marks and Adhesive Buildup Appear After Spraying?
Glue marks are not always caused by the color of the adhesive.
When the spray gun is too close to the material, the adhesive does not have enough space to form a fine mist. It lands in one area and may form large drops, wet spots, lines, and thick buildup.
After pressing, pressure can push the thick adhesive to the surface or edge. This creates clear glue marks. White uppers, light mesh, thin PU leather, and smooth materials are more sensitive to this problem.
1. What Is the Correct Spray Method?
Follow these points when spraying:
Keep the spray gun close to a 90° angle to the material surface.
Keep the spray distance steady.
Move the gun in a straight, parallel line. Do not swing it in an arc with your wrist.
Move at a steady speed. Do not stop over one spot.
Start moving the gun before opening the adhesive flow.
Stop the adhesive flow only after the gun has passed the material edge.
Overlap nearby spray passes to avoid missed areas.
To add more adhesive, use several thin passes. Do not make one heavy pass.
Before spraying real shoe materials, adjust the spray pattern on test paper.
Graco recommends smooth, parallel passes with about 50% overlap. 3M also notes that moving too slowly can leave too much adhesive. To add more adhesive, use several even passes instead of one heavy pass.
2. How Can You Check the Spray Pattern on Site?
Before production, test the spray pattern on both black and white test paper.
A good spray pattern should have:
Fairly even coverage in the center and at the edges.
No clear large drops.
No liquid drops or thick pools.
No clear gaps.
Little dry spray.
A smooth and mostly even film.
No clear runs after spraying.
For light-colored shoe materials, also check:
The look after drying.
The look after pressing.
The look after 24 hours.
Glue marks after bending.
Checking the material only right after spraying does not show whether glue marks will appear on the finished shoe.
3. When May the Glue Marks Come From the Adhesive Itself?
If spray distance, nozzle, air pressure, dry coating weight, and working speed are the same, but the new and old adhesives still show steady differences, check the product itself:
Viscosity stability.
Leveling performance.
Spray mist quality.
Film clarity.
Fit with light-colored materials.
Open time.
Batch-to-batch consistency.
Why Does the Adhesive Turn Yellow?
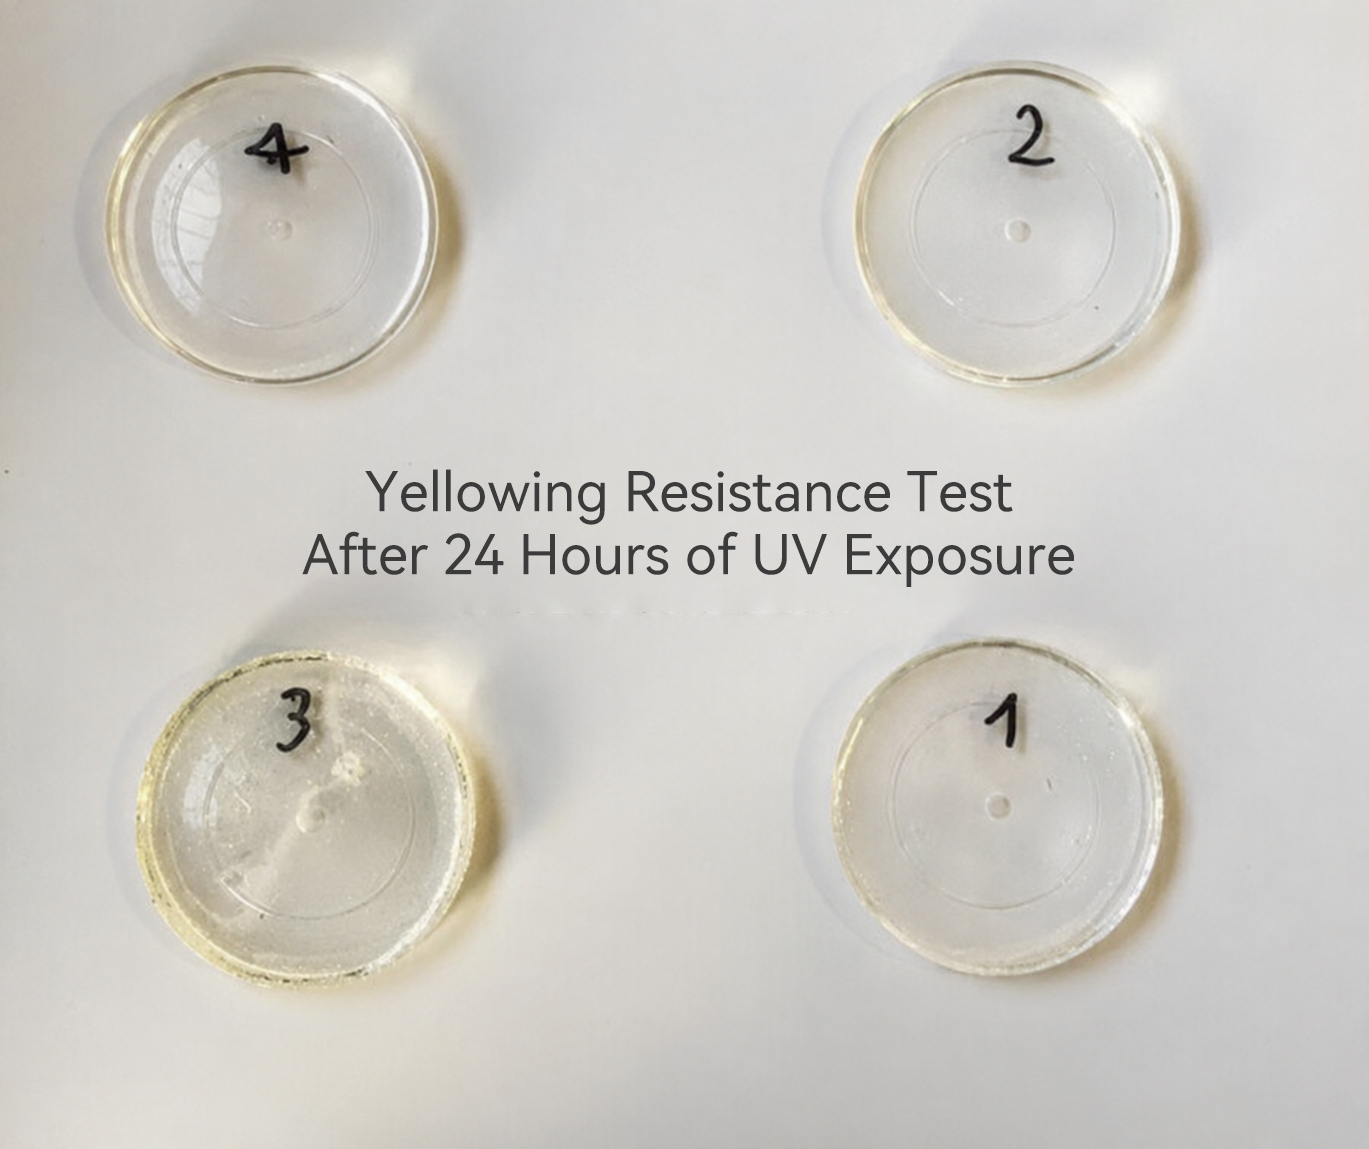
Yellowing can come from many causes, such as:
The resin system can cause yellowing. The hardener type, the hardener amount, and high heat can also cause it. This section mainly covers yellowing caused by long storage or poor storage conditions. Better storage cannot solve every yellowing problem.
Some polyurethane materials change under light and oxidation. This can make the color darker. Studies show that light is one main cause of polyurethane yellowing. The formula, oxidation, and stabilizers also affect the final result.
When May Yellowing Come From the Product Itself?
Keep the following conditions the same. If different adhesives still show steady differences, check the resin, additives, or hardener system:
The same film thickness.
The same hardener ratio.
The same shoe material batch.
The same storage conditions.
The same light and heat-aging conditions.
The same test time.
Also check whether the shoe material itself has turned yellow. Do not mistake a material color change for adhesive yellowing.
How Can You Check Whether a New Adhesive Really Solves the Problem?
Do not judge a new supplier’s product from only one sample. Do not rely only on claims such as “less odor” or “better yellowing resistance.”
A better test process is:
Step 1: Set a Baseline for the Current Adhesive
Record:
Current adhesive model and batch.
Current defects.
Defect rate.
Material type.
Coating amount.
Drying settings.
Spray settings.
Storage conditions.
Initial tack and peel strength.
Step 2: Keep Test Conditions the Same
The new and old adhesives must use:
The same material batch.
The same equipment.
The same operator.
The same coating amount.
The same drying settings.
The same pressing conditions.
The same curing time.
Step 3: Run Lab Tests Before a Small Trial
After the lab test passes, run a small production trial. Check:
Is it easy for workers to use?
Does it affect production speed?
Is the odor lower?
Are there fewer glue marks?
Is yellowing reduced?
Is bonding strength stable?
Are different batches consistent?
Step 4: Set Acceptance Standards
| Problem | Suggested check |
| Odor | Film condition after drying, sealed storage comparison, and VOC testing if needed |
| Glue marks | Spray pattern, appearance after pressing, and appearance after storage |
| Yellowing | Film color, color change after aging, and results on light-colored materials |
| Bonding performance | Initial tack, peel strength, and strength after aging |
| Batch consistency | Viscosity, solid content, color, and working performance |
Final limits should follow the customer’s standards, brand requirements, and the technical standard for the product.
Choosing a New Supplier Means More Than Changing One Pail of Adhesive
Odor, glue marks, yellowing, and unstable bonding are often caused by the combined effect of the adhesive, shoe materials, equipment, and production process. So, changing suppliers is not only about finding another adhesive. The new product should be checked through material study, same-condition tests, and a small trial run to see if it can truly improve the current problems.
A reliable shoe adhesive supplier should not promise that one product can solve every problem before learning about the materials and production conditions.
A better working process is:
Collect material and process details → Recommend a suitable product → Compare the old and new adhesives → Adjust spraying and drying settings → Run a small trial → Start full production and keep tracking results
HELEY focuses on adhesive solutions for footwear, bags, and related manufacturing. It provides PU adhesive, CR adhesive, spray adhesive, water-based adhesive, primers, cleaners, and hardeners.
Before HELEY recommends samples, customers can provide:
Upper and sole materials.
The adhesive type now in use.
Hardener type and mixing ratio.
Thinner type and mixing ratio.
Spraying, brushing, or roller-coating method.
Oven temperature and time.
Spray gun and nozzle details.
Current problems and defect rate.
With this information, HELEY can review the real shoe materials, equipment, and production conditions. It can help select suitable adhesive samples. The customer can then compare the old and new adhesives under the same conditions and run a small trial. This shows whether the new product can reduce odor, glue marks, yellowing, and unstable bonding. It also lowers quality risk when changing suppliers.
References
Graco, AirPro EFX Automatic Spray Gun Instructions: spray distance, mist adjustment, 90° spraying, and spray overlap.
3M, Cylinder Spray Adhesive User’s Guide: spray distance, adhesive film condition, spray speed, and spray pattern checks.
Bostik 1669 Sole Attaching Cement TDS: use, storage, shelf life, and safety notes for PU shoe adhesive.
Li et al., 2024, Yellowing-Resistant Waterborne Polyurethane: factors that affect polyurethane yellowing.
OSHA rules for flammable liquids and spray work: closed storage, ignition-source control, and mechanical ventilation.
